2014年8月20日 星期三
2014年6月19日 星期四
鼠標CSS效果
原始碼
<html>
<body>
<p>Mouse over the words to change the cursor.</p>
<span style="cursor:auto">auto</span><br>
<span style="cursor:crosshair">crosshair</span><br>
<span style="cursor:default">default</span><br>
<span style="cursor:e-resize">e-resize</span><br>
<span style="cursor:help">help</span><br>
<span style="cursor:move">move</span><br>
<span style="cursor:n-resize">n-resize</span><br>
<span style="cursor:ne-resize">ne-resize</span><br>
<span style="cursor:nw-resize">nw-resize</span><br>
<span style="cursor:pointer">pointer</span><br>
<span style="cursor:progress">progress</span><br>
<span style="cursor:s-resize">s-resize</span><br>
<span style="cursor:se-resize">se-resize</span><br>
<span style="cursor:sw-resize">sw-resize</span><br>
<span style="cursor:text">text</span><br>
<span style="cursor:w-resize">w-resize</span><br>
<span style="cursor:wait">wait</span><br>
<span style="cursor:not-allowed">not-allowed</span><br>
<span style="cursor:no-drop">no-drop</span><br>
</body>
</html>
滑鼠移到文字上可改變鼠標效果
auto
crosshair
default
e-resize
help
move
n-resize
ne-resize
nw-resize
pointer
progress
s-resize
se-resize
sw-resize
text
w-resize
wait
not-allowed
no-drop
2014年5月27日 星期二
RouterOS有無firewall規則Connections連線數有沒有差?
當設定好RouterOS撥接pppoe上網後,想比較看看防火牆有無啟動,對於連線Connections數的差異表現。
測試的防火牆過濾規則如下:
啟用防火牆閒置3小時後的Connections連線畫面內容

關閉防火牆閒置3小時後的Connections連線畫面內容

不太懂,好像沒什麼差耶~
測試的防火牆過濾規則如下:
/ ip firewall filter
add chain=input connection-state=established comment="Accept established connections"
add chain=input connection-state=related comment="Accept related connections"
add chain=input connection-state=invalid action=drop comment="Drop invalid connections"
add chain=input protocol=udp action=accept comment="UDP" disabled=no
add chain=input protocol=icmp limit=50/5s,2 comment="Allow limited pings"
add chain=input protocol=icmp action=drop comment="Drop excess pings"
add chain=input in-interface=ether2 src-address=192.168.0.0/24 comment="From our LAN" action=accept
add chain=input action=log log-prefix="DROP INPUT" comment="Log everything else"
add chain=input action=drop comment="Drop everything else"
啟用防火牆閒置3小時後的Connections連線畫面內容
關閉防火牆閒置3小時後的Connections連線畫面內容
RouterOS設定,家用電腦如何連接xDSL上網
如果你家裡是使用xDSL撥接上網,而目前想要將MikroTik Router設備加到你現有的架構中,可參考下列的圖例,把Router放在xDSL Modem及你的Hub之間。
而以下的說明,也是依據下圖的規劃做設定:
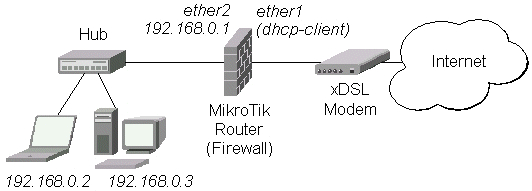 |
| 圖片來源:MikroTik官方網站 |
1.確認interface中,ether1 ether2是否啟用,ether1接對外撥接數據機,ether2接對內Hub或電腦。
/interface enable ether1,ether2

2.新增PPPoE Client撥接設定→撥接介面請選擇ether1→Dail Out的頁面,請輸入ISP公司提供的撥接帳號(User)、密碼(Password),若要使用ISP公司提供的DNS,請將User Peer DNS打勾,接著按下Apply鍵,RouterOS會自動撥接,若撥接成功,右下角就會出現connected的訊息,但此時你的電腦應該還不能上網,因為你連接對內的ether2網路介面還沒做設定。(以seednet為例)
/ interface pppoe-client
add interface=ether1 user="seednet" password="seednet" \
add-default-route=yes use-peer-dns=yes disabled=no


3.建立私有網路ether2的設定:/ip address → Address: 192.168.0.1/24 ,Network: 192.168.0.0 ,Interface: ether2
/ip address add address=192.168.0.1/24 interface=ether2


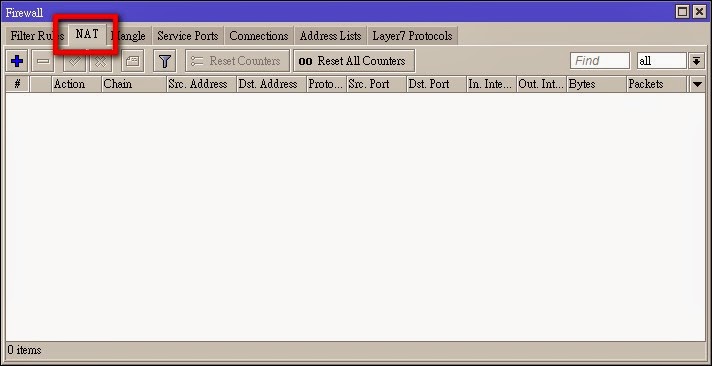
/ip firewall nat add chain=srcnat src-address=192.168.0.0/24 action=masquerade


5.其他的設定(視情況):防火牆設定
/ ip firewall filter
add chain=input connection-state=established comment="Accept established connections"
add chain=input connection-state=related comment="Accept related connections"
add chain=input connection-state=invalid action=drop comment="Drop invalid connections"
add chain=input protocol=udp action=accept comment="UDP" disabled=no
add chain=input protocol=icmp limit=50/5s,2 comment="Allow limited pings"
add chain=input protocol=icmp action=drop comment="Drop excess pings"
add chain=input in-interface=ether2 src-address=192.168.0.0/24 comment="From our LAN" action=accept
add chain=input action=log log-prefix="DROP INPUT" comment="Log everything else"
add chain=input action=drop comment="Drop everything else"
6.其他的設定(視情況):DHCP設定
/ip dhcp-server setup


7.其他的設定:DNS設定,讓本地端電腦可以透過RouterOS Cache解析DNS。
/ip dns set allow-remote-requests=yes

參考網頁:MikroTik官方網站
2014年5月24日 星期六
Linux環境下,更新本機時間的shell
更新本機時間的shell,隨機選取時間伺服器
更新本機時間的shell,但會先ping時間伺服器是否正常連線,時間伺服器若有所回應,才更新。反之,會改選擇下一個時間伺服器更新。
#!/bin/bashPATH=/bin:/sbin:/usr/bin:/usr/sbin:/usr/local/bin:/usr/local/sbinservs=(tock.stdtime.gov.tw watch.stdtime.gov.tw time.stdtime.gov.tw clock.stdtime.gov.tw tick.stdtime.gov.tw)declare -i number=$RANDOM*${#servs[*]}/32767ntpdate -s ${servs[$number]} #更新本机時間hwclock -w #寫入bios
更新本機時間的shell,但會先ping時間伺服器是否正常連線,時間伺服器若有所回應,才更新。反之,會改選擇下一個時間伺服器更新。
#!/bin/bashPATH=/bin:/sbin:/usr/bin:/usr/sbin:/usr/local/bin:/usr/local/sbin:~/binserver=(ntp.ntu.edu.tw time.stdtime.gov.tw clock.stdtime.gov.tw watch.stdtime.gov.tw)i=0until [ "$uptime" == "y" ]doping -c 1 -w 1 ${server[$i]} &> /dev/null && result=1 || result=0if [ "$result" == 1 ]; thenntpdate -s ${server[$i]}hwclock -wuptime="y"elseuptime="n"i=$(($i+1))fidone
Chrome 加掛 Auto-Translate 即時翻譯
1.搜尋「Auto Translate」

2.點右上角「+免費」進行安裝

3.確認新的擴充程式,按「新增」

4.接下來是安裝完成的畫面,並提示可以到Chrome-->設定-->擴充套件-->Auto-Translate-->選項-->進行調整


5.可選擇偵測的語言及要翻譯的語言。Hotkey是熱鍵功能,預設按住Ctrl 以及選取字詞才進行翻譯,可以自行調整。

http://briian.com/8086/auto-translate.html
Chrome 加掛 Google Dictionary,英英翻譯網頁
1.利用「Google Dictionary」搜尋

2.點右上角按鈕新增


4.要記得重啟Chrome,之後在要翻譯的英文字上左鍵點兩下,就可即時翻譯(英英翻譯)

Google Chrome即時翻譯的擴充套件Google Dictionary @ 軟體使用教學 :: 隨意窩 Xuite日誌
根據官方說法:密碼忘記的處理方法,系統設定一定會被清空。
RouterOS密碼忘記的處理
方法一:若是有機殼的RouterOS,面板上應該都會有一個Reset鍵,操作方法是:在還未開機的狀態下,先按住Reset鍵不放,之後才接上電源,直到黃燈閃爍時再放開Reset鍵,系統就會重啟恢復到出廠預設值,密碼也會清空。若操作正確的話,RouterOS應該會發出「嗶!嗶!」(要多點耐心多試幾次,熟能生巧)
方法一:若是有機殼的RouterOS,面板上應該都會有一個Reset鍵,操作方法是:在還未開機的狀態下,先按住Reset鍵不放,之後才接上電源,直到黃燈閃爍時再放開Reset鍵,系統就會重啟恢復到出廠預設值,密碼也會清空。若操作正確的話,RouterOS應該會發出「嗶!嗶!」(要多點耐心多試幾次,熟能生巧)
方法二:把RouterOS機殼拆開,找到機板上Reset的金屬圓片,用十字起子壓著,再插電開機,造成短路,此時大約幾秒鐘後聽到嗶嗶聲,放開後也會恢復出廠預設值。(以下的照片是以RB450G為例)
RB450G重啟復位後,我遇到的情形是Eth1是無法連線登入,但Eth2~5是可以的,反正沒差,之後再修改就好了,至於其他機型是否有這樣的問題,就不得而知了。另外,所有的設定值都被清空了,若當初有做過備份,File底下仍保有當初的備份檔,Restore即可,這也告訴我們隨時備份的重要性。


2014年5月10日 星期六
Ubuntu NetworkManager管理網路連線
自己的筆電平常都是利用無線上網,近日才發現自己的電腦竟無法連接有線上網,到底什麼時候發生的、怎麼發生的,也不太曉得,僅懷疑會不會是上次撥接上網設定失敗所造成的後遺症。
但事情總是要解決,不然哪天情急只能接網路線時,就糗大了。像下禮拜一、三的研習課程,就可能需要借助網路線,臨時當作Serve供人連線操作。
查了查資料後才知道,原來Ubuntu的NetworkManager網路管理程式,跟傳統的/etc/network/interfaces介面設定會有衝突的情形,簡單來說,若是要藉由Network Manager管理網路設定,就必須將/etc/network/interfaces底下的其他網路介面的設定刪除或註解掉,僅留下
auto lo
iface lo inet loopback
當初無法上網,就是因為/etc/network/interfaces底下多了
auto eth0
iface eth0 inet dhcp
Ubuntu下的Network-manager網路管理與interfaces的網路管理僅能擇一設定,若是希望interfaces下的設定能啟用,反之就是要將Network manager關閉,指令為:
sudo stop networkmanager
參考資料: 石頭閒語:Ubuntu NetworkManager 使用要項
訂閱:
文章 (Atom)