如果你家裡是使用xDSL撥接上網,而目前想要將MikroTik Router設備加到你現有的架構中,可參考下列的圖例,把Router放在xDSL Modem及你的Hub之間。
而以下的說明,也是依據下圖的規劃做設定:
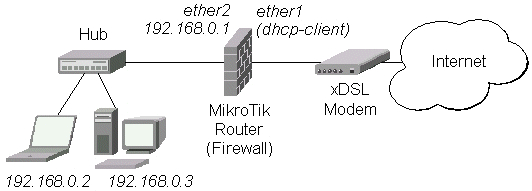 |
| 圖片來源:MikroTik官方網站 |
1.確認interface中,ether1 ether2是否啟用,ether1接對外撥接數據機,ether2接對內Hub或電腦。
/interface enable ether1,ether2

2.新增PPPoE Client撥接設定→撥接介面請選擇ether1→Dail Out的頁面,請輸入ISP公司提供的撥接帳號(User)、密碼(Password),若要使用ISP公司提供的DNS,請將User Peer DNS打勾,接著按下Apply鍵,RouterOS會自動撥接,若撥接成功,右下角就會出現connected的訊息,但此時你的電腦應該還不能上網,因為你連接對內的ether2網路介面還沒做設定。(以seednet為例)
/ interface pppoe-client
add interface=ether1 user="seednet" password="seednet" \
add-default-route=yes use-peer-dns=yes disabled=no


3.建立私有網路ether2的設定:/ip address → Address: 192.168.0.1/24 ,Network: 192.168.0.0 ,Interface: ether2
/ip address add address=192.168.0.1/24 interface=ether2


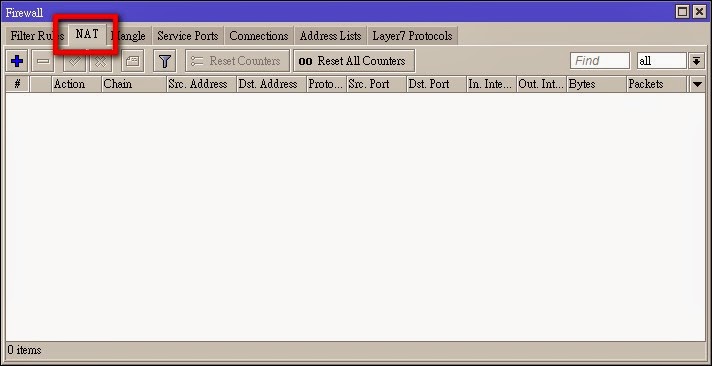
/ip firewall nat add chain=srcnat src-address=192.168.0.0/24 action=masquerade


5.其他的設定(視情況):防火牆設定
/ ip firewall filter
add chain=input connection-state=established comment="Accept established connections"
add chain=input connection-state=related comment="Accept related connections"
add chain=input connection-state=invalid action=drop comment="Drop invalid connections"
add chain=input protocol=udp action=accept comment="UDP" disabled=no
add chain=input protocol=icmp limit=50/5s,2 comment="Allow limited pings"
add chain=input protocol=icmp action=drop comment="Drop excess pings"
add chain=input in-interface=ether2 src-address=192.168.0.0/24 comment="From our LAN" action=accept
add chain=input action=log log-prefix="DROP INPUT" comment="Log everything else"
add chain=input action=drop comment="Drop everything else"
6.其他的設定(視情況):DHCP設定
/ip dhcp-server setup


7.其他的設定:DNS設定,讓本地端電腦可以透過RouterOS Cache解析DNS。
/ip dns set allow-remote-requests=yes

參考網頁:MikroTik官方網站
how to set wan=dhcp?
回覆刪除ether1=wan dhcp
刪除DHCP Client
刪除